The one part of my outfit that I decided to make prior to the start of the competition was to make a pair of shoes.
Shoes are possibly the hardest part of an outfit to get right, they really make or break the impression of a historical presentation. For me shoe making has been a goal of mine for a long time. My persona is based on my families history in the Northamptonshire area of England. Towards the end of the 16th century and expanding hugely in the 17th century Northampton was a major shoe producer in England all the way into the 20th century. Many of my mothers family worked in shoe production or in leather production to for shoes in the 20th century. My grandfather was both a shoemaker, and a cobbler. Shoes are in my blood, and learning how to make them has been one of those projects that has really allowed me to feel a connection to my family, and my personas, past.
If you are interested in reproducing shoes, or just want to know what kind of shoes your chosen persona might have worn, you need to get a copy of Stepping Through Time by Olaf Goubitz. The book covers shoes and boots ranging from the iron age all the way to the 19th century. The shoes I decided to reproduce for this outfit are shown on page 283, they are a decorated pair of latch shoe, found on a Dutch shipwreck, which sank in the Wadden sea in the 1590s.

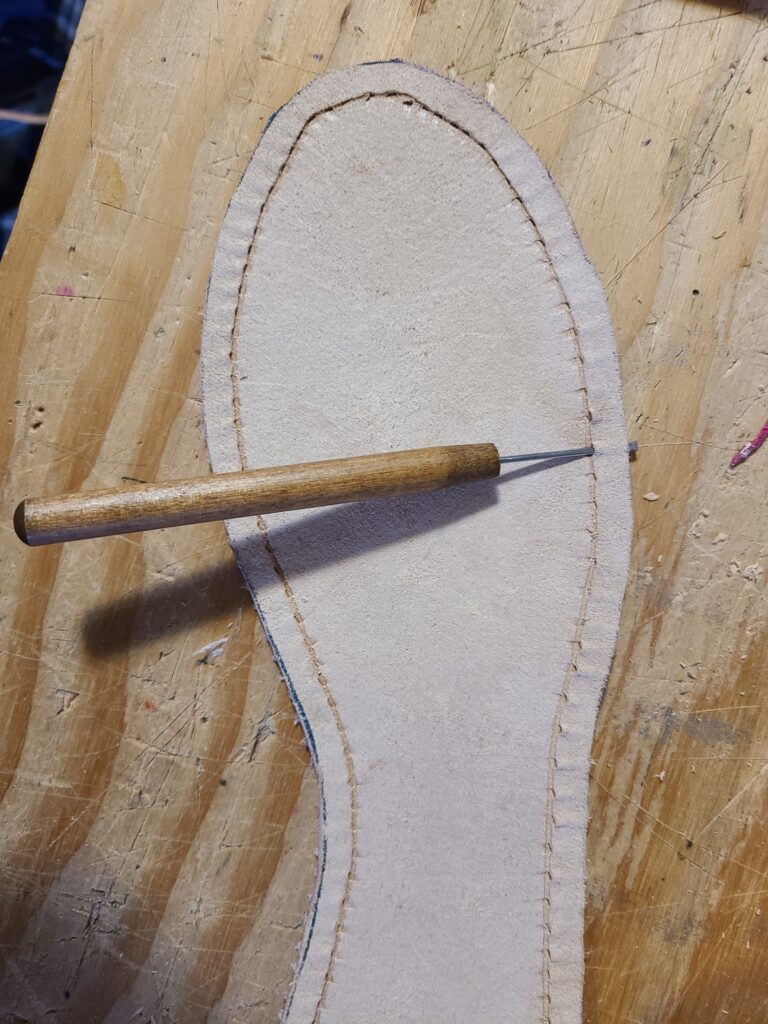
The shoes are made of different weights of vegetable tanned leather. The basic principle of using vegetative materials to tan leather has not changed much over the course of history, it still relies on using materials high in tannic acid to tan and preserve leather. A wonderful example of a un-intentional tanning are the “bog bodies” found in highly tannic peat bogs in Europe. The shoes are all sewn together using a heavy linen thread, waxed with beeswax. To get the correct shapes for the shoes I purchased a pair of antique wooden shoe lasts (forms). The first part of the process was to work up a pattern. I used the information from Stepping Through Time to form the basis of the patterns, then sized it for my own feet and the wooden lasts. The upper parts of the shoe are 3 pieces, 2 parts to create the heal and sides, and one large part for the forepart. The back pieces are joined at the heal using a buttstitch. The next step was to create holes for the stitching of the insole to the upper parts of the shoe as well as the welts. Welts are a strip of leather (or these days made of rubber or neoprene) which are sewn to the upper parts of the shoe and are then stitched down to the soles. By the end of the 16th century “turnshoes” (shows sewn together inside out and then turned right side out) have fallen out of style in favor of welted shoe construction. The holes are pierced with an awl, starting on the bottom of the insole and out through the sides. Once I had the stitching holes worked through the insoles, the upper parts and welt were stitched down with a strong backstitch.

With the upper parts joined to the insole the sole, made from a heavier grade of leather, is glued to the bottom of the insole. In this case I used a modern pva based glue. With the sole glued in place the welt is first wetted, then folded down and flattened to the sole. The welt is then stitched to the sole.


I also added a separate heel to these shoes. It is made from a second piece of thick leather, as well as piece of rubber sole material (no period, but I’ve messed up my ankles enough as it is).
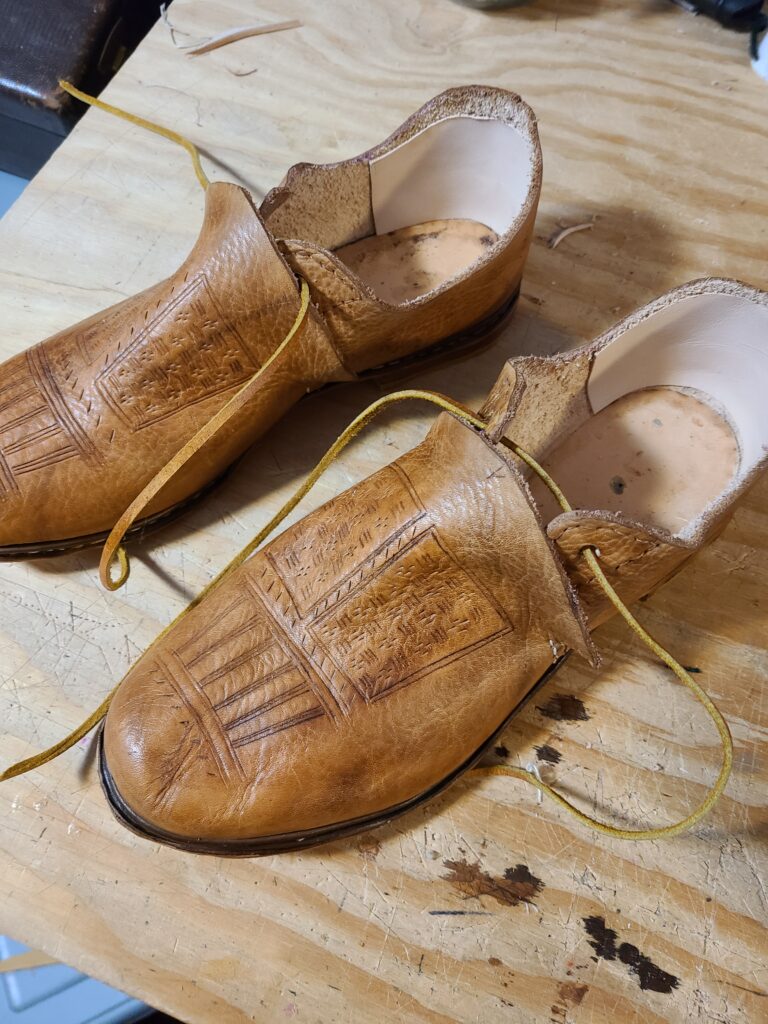
One of the things that really drew me to recreating this pair of shoes is the extensive slashing and pinking seen on the extant ones. I recreated the decorations seen on the extant ones using incised lines (done by wetting the leather and impressing the lines with an awl), and by creating small slashes using very small wood chisels.


Once the decorations were done the shoes were finished by dying them with a water based modern dye, in period this would have been done with natural dyes like walnut husks, buckthorn berries, or iron dissolved in vinegar (creates a chemical reaction to get a black color). Unfortunately I made these shoes in the winter months and my supply of natural dyes was sadly frozen solid in the garage…. When the dye was dry I finished the shoes with a coat of beeswax and mink oil to waterproof them. The sides of the soles/welt was smoothed with sandpaper and a bone slicker. The final part of the process was to install additional bit of leather to reenforce the heels, and to add leather lace to tie them closed.

These are a beautiful pair of shoes. Having done 1 or 2 pairs in the past, I know just enough to see how well-made these are. Agreed on Goubitz – all of his works are great resources for anyone interested in leatherwork.